默认分类 EXAD杀毒排除项目 排除路径: D:\\ht-database E:\\ht-database C:\Program Files\Microsoft\Exchange Server\V15\ C:\Windows\System32\WindowsPowerShell\v1.0 排除文件名后缀: *.edb *.log .mfs .merge .state .@meta .mail.que .jfm .chk .mail.que trnres00001.jrs 排除进程: C:\Program Files\Microsoft\Exchange Server\V15\Bin\msexchangerepl.exe C:\Program Files\Microsoft\Exchange Server\V15\Bin\Search\Ceres\Runtime\1.0\noderunner.exe C:\Program Files\Microsoft\Exchange Server\V15\Bin\Microsoft.Exchange.Store.Worker.exe C:\Program Files\Microsoft\Exchange Server\V15\bin\Microsoft.Exchange.Store.Service.exe C:\Program Files\Microsoft\Exchange Server\V15\Bin\Search\Ceres\HostController\hostcontrollerservice.exe C:\Program Files\Microsoft\Exchange Server\V15\bin\Microsoft.Exchange.Search.Service.exe C:\Program Files\Microsoft\Exchange Server\V15\Bin\MSExchangeTransport.exe C:\Program Files\Microsoft\Exchange Server\V15\Bin\MSExchangeTransportLogSearch.exe C:\Program Files\Microsoft\Exchange Server\V15\Bin\MSExchangeDelivery.exe C:\Program Files\Microsoft\Exchange Server\V15\Bin\MSExchangeSubmission.exe C:\Program Files\Microsoft\Exchange Server\V15\Bin\MSExchangeMailboxReplication.exe C:\Program Files\Microsoft\Exchange Server\V15\Bin\MSExchangeMailboxAssistants.exe C:\Program Files\Microsoft\Exchange Server\V15\Bin\MSExchangeHMHost.exe C:\Program Files\Microsoft\Exchange Server\V15\Bin\MSExchangeHMRecovery.exe C:\Program Files\Microsoft\Exchange Server\V15\FrontEnd\PopImap\Microsoft.Exchange.Imap4Service.exe C:\Program Files\Microsoft\Exchange Server\V15\ClientAccess\PopImap\Microsoft.Exchange.Imap4Service.exe C:\Program Files\Microsoft\Exchange Server\V15\FrontEnd\PopImap\Microsoft.Exchange.Pop3Service.exe C:\Program Files\Microsoft\Exchange Server\V15\ClientAccess\PopImap\Microsoft.Exchange.Pop3Service.exe C:\Windows\Cluster\clussvc.exe https://blog.csdn.net/wenzhongxiang/article/details/86706238 AD排除 在域控服务器上安装杀毒软件时要排除对那些位置的扫描,以避免域控的崩溃呢?总结了下,有以下几点: 1.排除主 NTDS 数据库文件。默认位置是 %windir%\Ntds。 2.排除 Active Directory 事务日志文件。默认位置是 %windir%\Ntds。 3.关闭对 SYSVOL 文件的扫描:从该文件夹及其所有子文件夹中排除以下文件:*.adm、*.admx、*.adml、Registry.pol、*.aas、*.inf、Fdeploy.inf、Scripts.ini、*.ins、Oscfilter.ini 4.关闭对以下注册表项中指定的文件复制服务 (FRS) 工作文件夹中的文件的扫描。默认位置是 %windir%\Ntfrs。 5.关闭对以下注册表项中指定的 FRS 数据库日志文件的扫描。默认位置是%windir%\Ntfrs。 6.关闭对以下注册表项中指定的暂存文件夹的扫描。默认状态下,暂存文件使用以下位置:%systemroot%\Sysvol\Staging areas 7.关闭对 Sysvol\Sysvol 文件夹中的文件的扫描。%systemroot%\Sysvol\Domain 8.关闭对 DFSR 数据库和工作文件夹中的文件的扫描。位置由以下注册表项指定:默认位置为以下隐藏文件夹:%systemdrive%\System Volume Information\DFSR 进程排除项 C:\Windows\System32\dfsr.exe C:\Windows\System32\dfsrs.exe C:\Windows\System32\ntfrs.exe C:\Windows\System32\lsass.exe C:\Windows\System32\dns.exe 阅读全文 2025-09-27 丿记性不太好丶 0 条评论 177 次浏览
默认分类 群辉NAS 使用第三方硬盘 Setting up a new 2025 or later plus model with only unverified HDDs Credit to Alex_of_Chaos on reddit DSM won't install on a 2025 or later series plus model if you only have unverified HDDs. But we can get around that. Start telnet by entering http://<NAS-IP>:5000/webman/start_telnet.cgi into your browser's address bar. Replace <NAS-IP> with the IP address of the Synology NAS. Open a telnet client (powershell, PuTTY etc) on your computer and connect to the Synology with 'telnet `. Replace <NAS-IP> with the IP address of the Synology NAS. Log into telnet with: root for the login 101-0101 for the password Execute the following command: (using a while loop in case DSM is running in a VM) while true; do touch /tmp/installable_check_pass; sleep 1; done Refresh the web installation page and install DSM. Then in the telnet window, or via SSH, execute the following command: /usr/syno/bin/synosetkeyvalue /etc.defaults/synoinfo.conf support_disk_compatibility no If Storage Manager is already open close then open it, or refresh the web page. If refreshing the page or restarting Storage Manager is not working, try restarting your Synology NAS. You can now create your storage pool from Storage Manager. 硬盘兼容列表修改: 在群晖控制面板找到终端命令勾选SSH,使用连接工具或Windows操作 ssh登录到群晖 1、windows运行cmd 2、输入:ssh管理员账号@群晖IP地址(ssh p@10.168.4.16)回车 3、sudo -i 4、输入vi /etc.defaults/synoinfo.conf 5、按i进入编辑模式 6、找到support_disk_compatibility="yes" // =>把yes改成no 就是关闭硬盘验证 7、重启群晖:reboot 阅读全文 2025-09-27 丿记性不太好丶 0 条评论 197 次浏览
默认分类 如果第三方业务系统为匿名,需要外发到不同的域中,需要开启连接器匿名转发 去除匿名中继的权限(去除仿冒内部邮件地址) Get-ReceiveConnector "Internet Receive Connector" | Remove-ADPermission -User "NT AUTHORITY\ANONYMOUS LOGON" -ExtendedRights "Ms-Exch-SMTP-Accept-Any-Recipient" 允许匿名中继 Get-ReceiveConnector "Internet Receive Connector" | add-ADPermission -User "NT AUTHORITY\ANONYMOUS LOGON" -ExtendedRights "Ms-Exch-SMTP-Accept-Any-Recipient" 阅读全文 2025-09-27 丿记性不太好丶 0 条评论 176 次浏览
默认分类 AD 域DFS同步卡住的情况 在ADSI编辑器中定位到CN=SYSVOL Subscription msDFSR-Enabled 关掉 重启 netlogin和AD服务 ,然后再改成true 重启AD服务和netlogin即可 阅读全文 2025-09-21 丿记性不太好丶 0 条评论 176 次浏览
默认分类 IP-Guard 系统维护 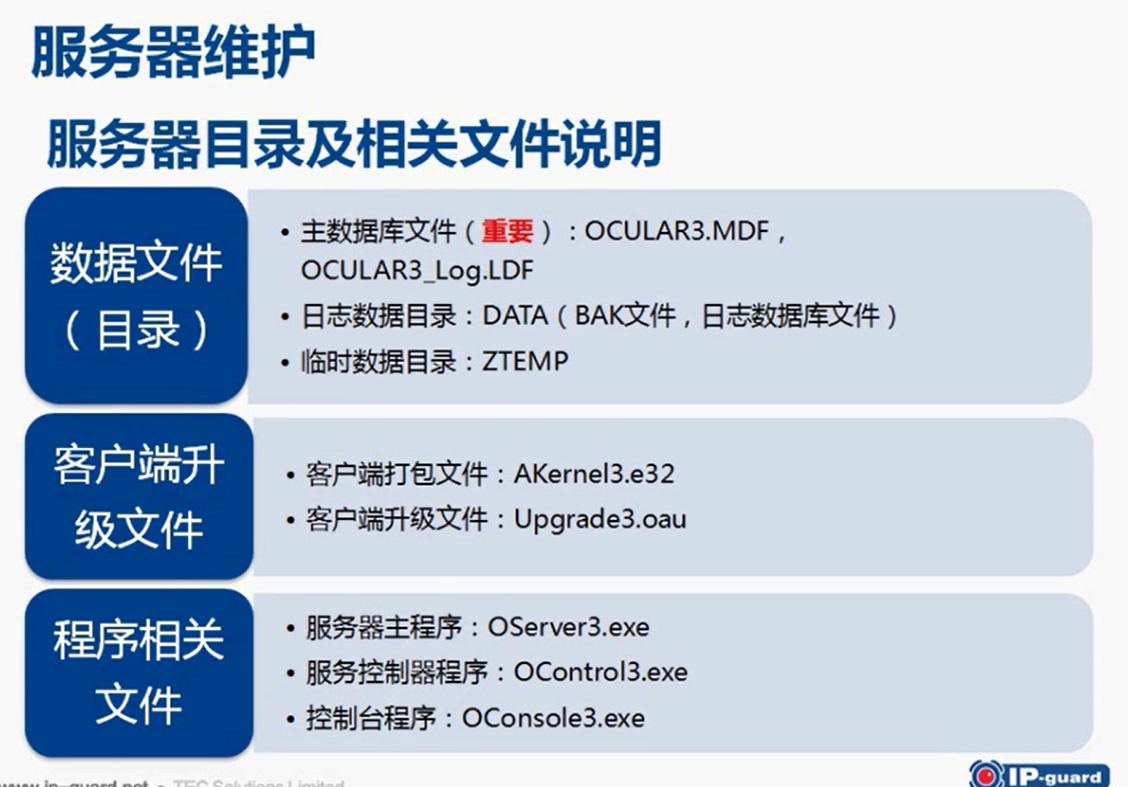  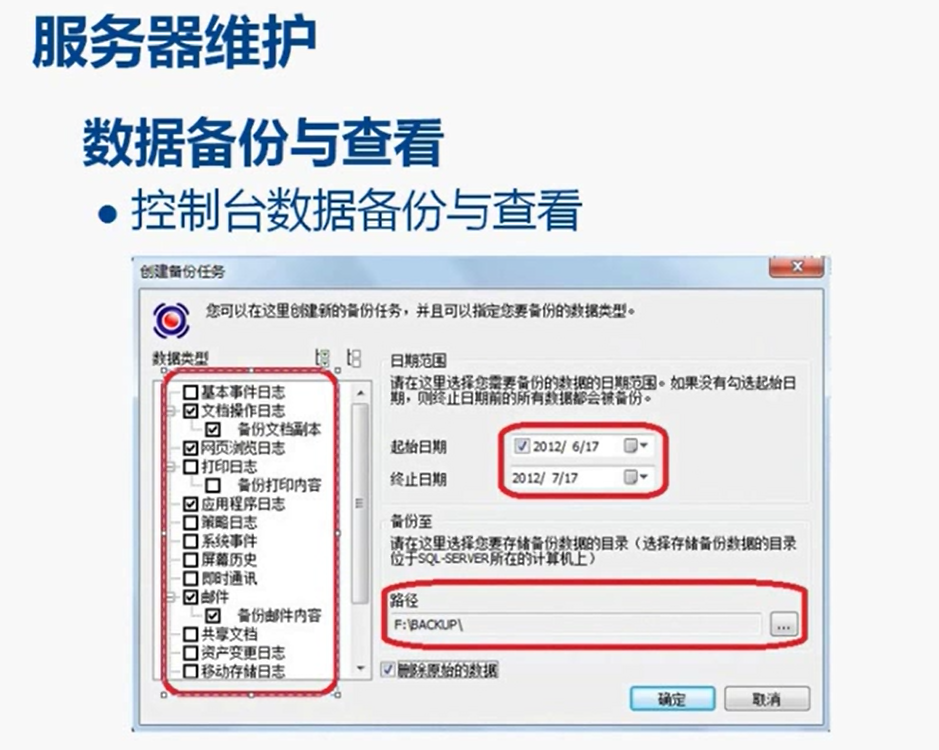 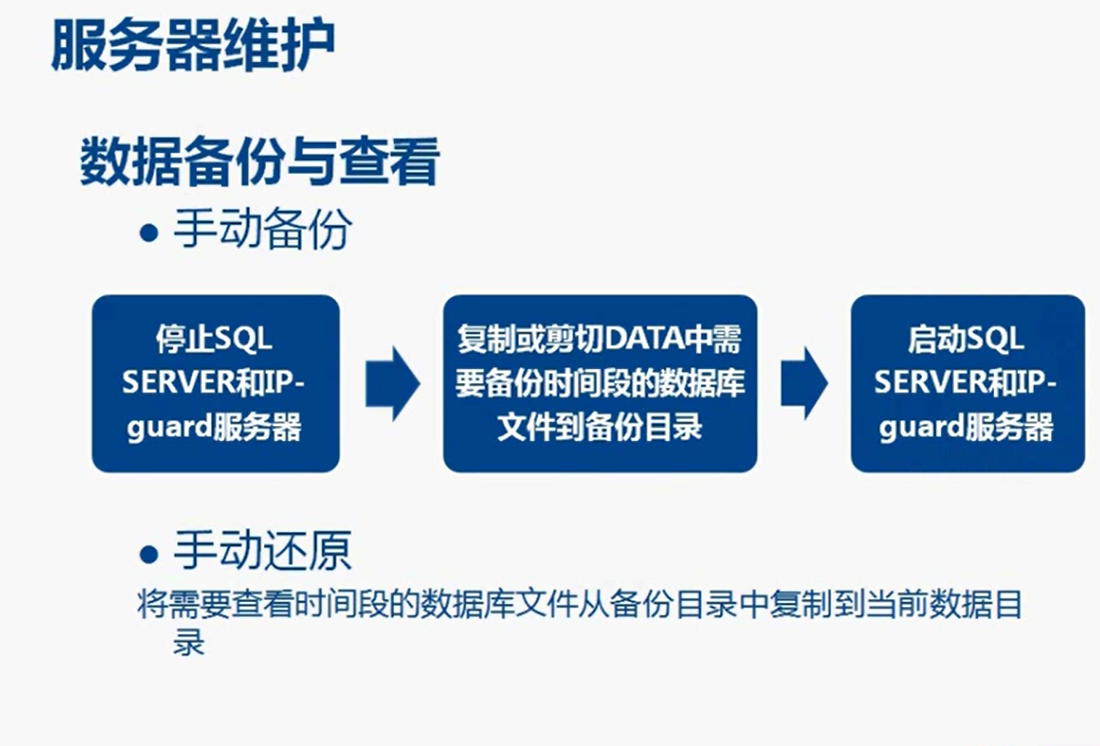 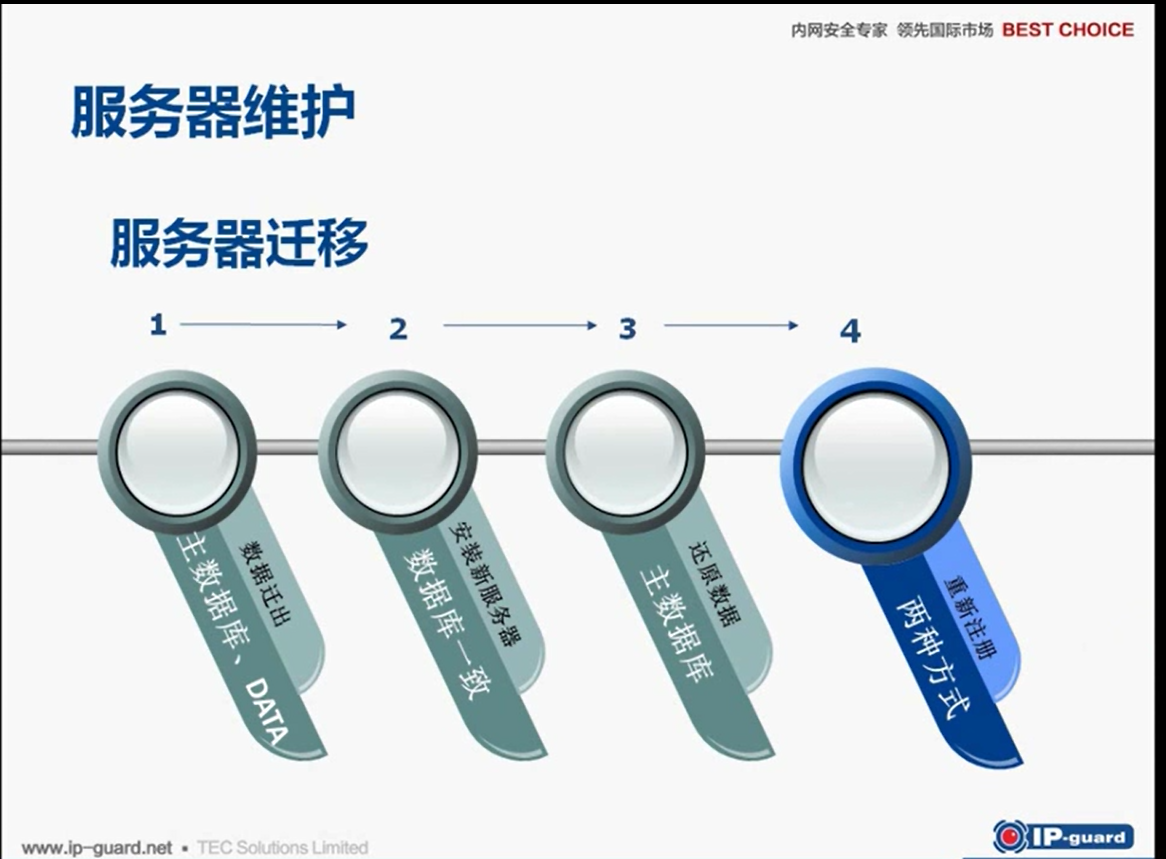 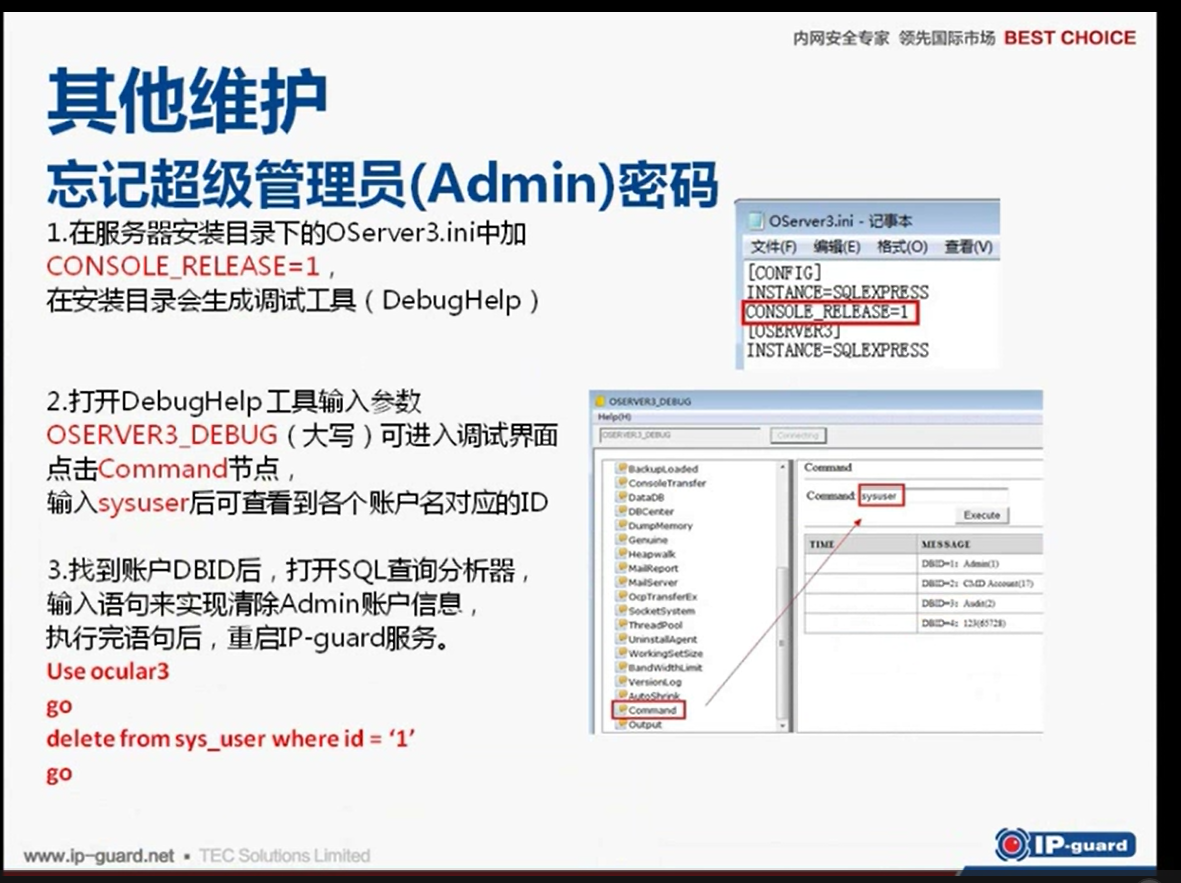 阅读全文 2025-09-21 丿记性不太好丶 0 条评论 192 次浏览
